
Do you want to build the latest version of Oracle Database, Oracle 26ai Real Application Clusters (Oracle RAC), but find yourself stuck on preliminary OS settings or shared disk preparation? This article provides a detailed explanation of the entire process for constructing Oracle Grid Infrastructure (GI), the foundation of the cluster, based on actual system logs. Note that this environment utilizes an Oracle VM environment.
In conclusion, the success of a RAC installation depends on “network consistency,” “shared disk permission settings,” and “trust relationships between users.” By following this guide, you can complete the GI installation in a verification environment without hesitation.
- Conclusion: Shortest Step List for GI Construction
- Background and Basics: What are Oracle RAC and GI?
- Prerequisites for the Environment (Important)
- Step 1: Adding Shared Disks (Oracle VM)
- Step 2: Preliminary Network Configuration and Environment Variables
- Step 3: Shared Disk Configuration (udev)
- Step 4: Directory Preparation and SSH Trust Relationships
- Step 5: Oracle RAC Installation (GUI)
- Step 6: Post-Installation Verification and DATA Disk Creation
- Troubleshooting
- FAQ
- Summary
Conclusion: Shortest Step List for GI Construction
- Adding Shared Disks: Add two shared disks from the Oracle VM settings.
- Software Acquisition: Download packages from the Oracle Software Delivery Cloud.
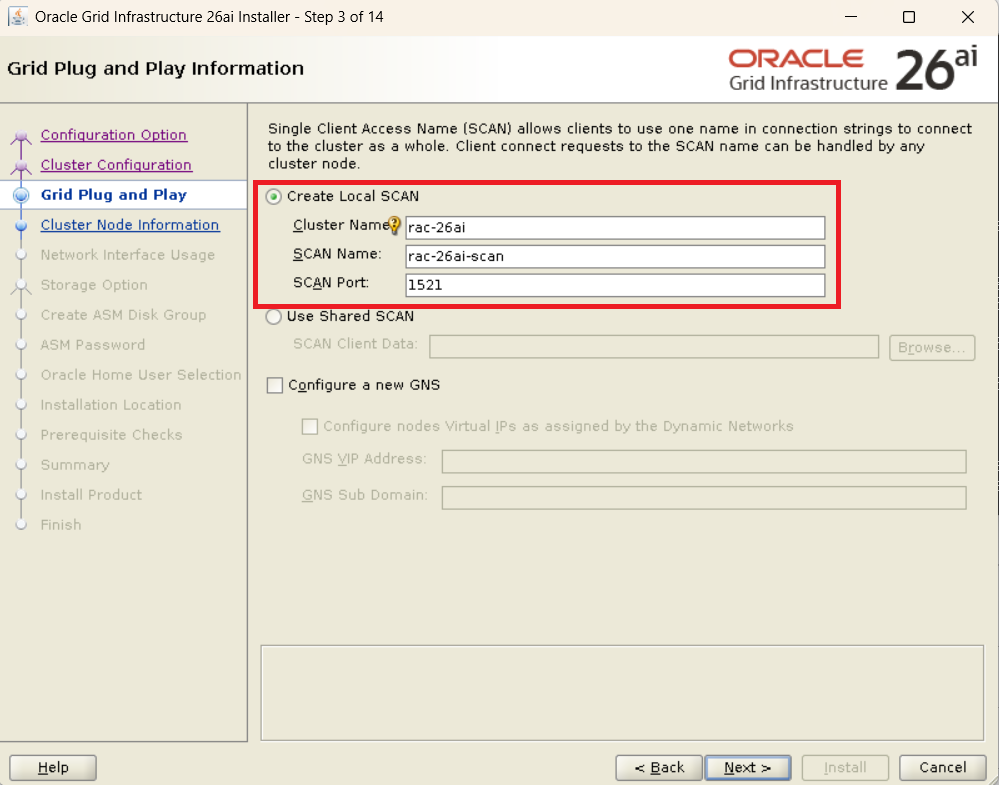
- DNS/NTP Settings: Refer to 192.168.56.18 to configure SCAN resolution and time synchronization.
- OS Settings: Configure
/etc/hostsand define environment variables in.bash_profile. - Shared Disk Preparation: Create partitions with
partedand fix permissions togrid:asmadminusingudev. - Establishing Trust Relationships: Configure SSH passwordless authentication for both
gridandoracleusers. - Installation Execution: Launch
gridSetup.shto configure the cluster from Node 1.

Background and Basics: What are Oracle RAC and GI?
Oracle Real Application Clusters (Oracle RAC) is an availability configuration that allows a single database to run across multiple servers. The underlying foundation supporting this is Oracle Grid Infrastructure (GI), which handles cluster management and Oracle Automatic Storage Management (Oracle ASM).
Prerequisites for the Environment (Important)
This procedure assumes that the following tasks have been completed:
- Installation of the OS (Oracle Linux 8/9, etc.) and execution of the pre-installation RPM (such as
oracle-database-preinstall-23ai). - An external DNS and NTP server (192.168.56.18) is already established and in use.
Caution: If these are not configured or are unreachable, the Cluster Verification Utility (CVU) will return a “Failed” status, and the installation cannot be completed. In particular, reverse lookup resolution for the Single Client Access Name (SCAN) is mandatory.
Step 1: Adding Shared Disks (Oracle VM)
Before starting the installation, add shared disks that can be referenced from each node in the Oracle VM settings.
- Disk Creation: From the management screen of Oracle VM VirtualBox or similar, create two virtual disks (e.g.,
.vdi) with sharing settings enabled.- 1st Disk: For OCR/Voting Disk (e.g., 20GB)
- 2nd Disk: For DATA (e.g., 30GB)
- Assigning Shareable Attribute: Set the created disks to “Shareable” and attach them to both
rac-26ai1andrac-26ai2.
Step 2: Preliminary Network Configuration and Environment Variables
Configure the DNS and NTP client settings that support the cluster foundation. The private network must be on a different subnet than the public and VIP networks.
2.1 Network Configuration Values
The following network configuration is used:
| Type | IP Address | Hostname |
|---|---|---|
| Public | 192.168.56.61 | rac-26ai1.example.local |
| Public | 192.168.56.62 | rac-26ai2.example.local |
| Private | 192.168.57.61 | rac-26ai1-pr.example.local |
| Private | 192.168.57.62 | rac-26ai2-pr.example.local |
| Virtual (VIP) | 192.168.56.63 | rac-26ai1-vip.example.local |
| Virtual (VIP) | 192.168.56.64 | rac-26ai2-vip.example.local |
2.2 DNS Client Configuration (nmcli)
Configure the settings for the public side interface (enp0s3).
nmcli connection modify "enp0s3" ipv4.dns "192.168.56.18"
nmcli connection modify "enp0s3" ipv4.dns-search "example.local"
nmcli connection up "enp0s3"

# Verify reflection
cat /etc/resolv.conf
# OK if "nameserver 192.168.56.18" is displayed
2.3 Validation of DNS Resolution
# Verify SCAN resolution
nslookup rac-26ai-scan.example.local

# Verify connectivity to the peer node
ping -c 3 rac-26ai2
2.4 NTP Client Configuration (chrony)
chronyc add server 192.168.56.18 iburst
chronyc sources
# OK if "^* 192.168.56.18" is displayed
[root@rac-26ai1 ~]# nmcli connection modify "enp0s3" ipv4.dns "192.168.56.18"
[root@rac-26ai1 ~]# nmcli connection modify "enp0s3" ipv4.dns-search "example.local"
[root@rac-26ai1 ~]# nmcli connection up "enp0s3"
Connection successfully activated (D-Bus active path: /org/freedesktop/NetworkManager/ActiveConnection/4)
[root@rac-26ai1 ~]# cat /etc/resolv.conf
# Generated by NetworkManager
search example.local
nameserver 192.168.56.18
[root@rac-26ai1 ~]# nslookup rac-26ai-scan.example.local
Server:         192.168.56.18
Address:        192.168.56.18#53

Name:   rac-26ai-scan.example.local
Address: 192.168.56.66
Name:   rac-26ai-scan.example.local
Address: 192.168.56.65
Name:   rac-26ai-scan.example.local
Address: 192.168.56.67

[root@rac-26ai1 ~]# nslookup 192.168.56.65
65.56.168.192.in-addr.arpa      name = rac-26ai-scan.example.local.

[root@rac-26ai1 ~]# ping -c 3 rac-26ai2
PING rac-26ai2.example.local (192.168.56.62) 56(84) bytes of data.
64 bytes from rac-26ai2.example.local (192.168.56.62): icmp_seq=1 ttl=64 time=0.581 ms
64 bytes from rac-26ai2.example.local (192.168.56.62): icmp_seq=2 ttl=64 time=1.13 ms
64 bytes from rac-26ai2.example.local (192.168.56.62): icmp_seq=3 ttl=64 time=1.42 ms

--- rac-26ai2.example.local ping statistics ---
3 packets transmitted, 3 received, 0% packet loss, time 2029ms
rtt min/avg/max/mdev = 0.581/1.043/1.416/0.346 ms
[root@rac-26ai1 ~]# chronyc add server 192.168.56.18 iburst
200 OK
[root@rac-26ai1 ~]# chronyc sources
MS Name/IP address         Stratum Poll Reach LastRx Last sample
===============================================================================
^* 192.168.56.18                10   6    17     1    +35us[  -29us] +/-  669us
2.5 hosts File and .bash_profile
# Append to hosts file
cat << EOF >> /etc/hosts
192.168.56.61   rac-26ai1.example.local   rac-26ai1
192.168.56.62   rac-26ai2.example.local   rac-26ai2
192.168.57.61   rac-26ai1-pr.example.local   rac-26ai1-pr
192.168.57.62   rac-26ai2-pr.example.local   rac-26ai2-pr
192.168.56.63   rac-26ai1-vip.example.local   rac-26ai1-vip
192.168.56.64   rac-26ai2-vip.example.local   rac-26ai2-vip
EOF

# Environment settings for the grid user
su - grid
cat << EOF >> ~/.bash_profile
export ORACLE_SID=+ASM1
export ORACLE_BASE=/u01/app/23.0.0/grid_base
export ORACLE_HOME=/u01/app/23.0.0/grid
export PATH=\$PATH:\$ORACLE_HOME/bin:\$ORACLE_HOME/OPatch
EOF
source ~/.bash_profile
Step 3: Shared Disk Configuration (udev)
Fix the permissions for the disk devices used by ASM. In this guide, we use External Redundancy for the verification environment. If redundancy is required for production, please add shared disks as appropriate.
3.1 Partition Creation (Node 1 Only)
parted /dev/sdb mklabel msdos mkpart primary 2048s 100%
parted /dev/sdc mklabel msdos mkpart primary 2048s 100%
3.2 Fixing Permissions (Perform on Both Nodes)
vi /etc/udev/rules.d/99-oracle-asm.rules

# Enter the following
KERNEL=="sdb1", OWNER="grid", GROUP="asmadmin", MODE="0660"
KERNEL=="sdc1", OWNER="grid", GROUP="asmadmin", MODE="0660"

# Apply settings
udevadm control --reload
udevadm trigger

# Verify reflection
ls -l /dev/sdb1 /dev/sdc1
# Confirm that it is set to grid asmadmin
[root@rac-26ai1 ~]# ll /dev/sd*
brw-rw----. 1 root disk 8,  0 Feb 10 21:30 /dev/sda
brw-rw----. 1 root disk 8,  1 Feb 10 21:30 /dev/sda1
brw-rw----. 1 root disk 8,  2 Feb 10 21:30 /dev/sda2
brw-rw----. 1 root disk 8, 16 Feb 10 21:30 /dev/sdb
brw-rw----. 1 root disk 8, 32 Feb 10 21:30 /dev/sdc
[root@rac-26ai1 ~]# parted /dev/sdb mklabel msdos mkpart primary 2048s 100%
Information: You may need to update /etc/fstab.

[root@rac-26ai1 ~]# parted /dev/sdc mklabel msdos mkpart primary 2048s 100%
Information: You may need to update /etc/fstab.

[root@rac-26ai1 ~]# ll /dev/sd*
brw-rw----. 1 root disk 8,  0 Feb 10 21:26 /dev/sda
brw-rw----. 1 root disk 8,  1 Feb 10 21:26 /dev/sda1
brw-rw----. 1 root disk 8,  2 Feb 10 21:26 /dev/sda2
brw-rw----. 1 root disk 8, 16 Feb 10 21:33 /dev/sdb
brw-rw----. 1 root disk 8, 17 Feb 10 21:33 /dev/sdb1
brw-rw----. 1 root disk 8, 32 Feb 10 21:34 /dev/sdc
brw-rw----. 1 root disk 8, 33 Feb 10 21:34 /dev/sdc1
[root@rac-26ai1 ~]# vi /etc/udev/rules.d/99-oracle-asm.rules
[root@rac-26ai1 ~]# ll /dev/sdb1 /dev/sdc1
brw-rw----. 1 grid asmdba 8, 17 Feb 11 02:33 /dev/sdb1
brw-rw----. 1 grid asmdba 8, 33 Feb 11 02:33 /dev/sdc1
[root@rac-26ai1 ~]# udevadm control --reload
[root@rac-26ai1 ~]# udevadm trigger
[root@rac-26ai1 ~]# ll /dev/sd*
brw-rw----. 1 root disk   8,  0 Feb 11 02:33 /dev/sda
brw-rw----. 1 root disk   8,  1 Feb 11 02:33 /dev/sda1
brw-rw----. 1 root disk   8,  2 Feb 11 02:33 /dev/sda2
brw-rw----. 1 root disk   8, 16 Feb 11 02:33 /dev/sdb
brw-rw----. 1 grid asmdba 8, 17 Feb 11 02:33 /dev/sdb1
brw-rw----. 1 root disk   8, 32 Feb 11 02:33 /dev/sdc
brw-rw----. 1 grid asmdba 8, 33 Feb 11 02:33 /dev/sdc1
[root@rac-26ai1 ~]#
Step 4: Directory Preparation and SSH Trust Relationships
4.1 Directory Creation and Permission Granting (root user)
mkdir -p /u01/app/oracle/product/23.0.0/dbhome_1
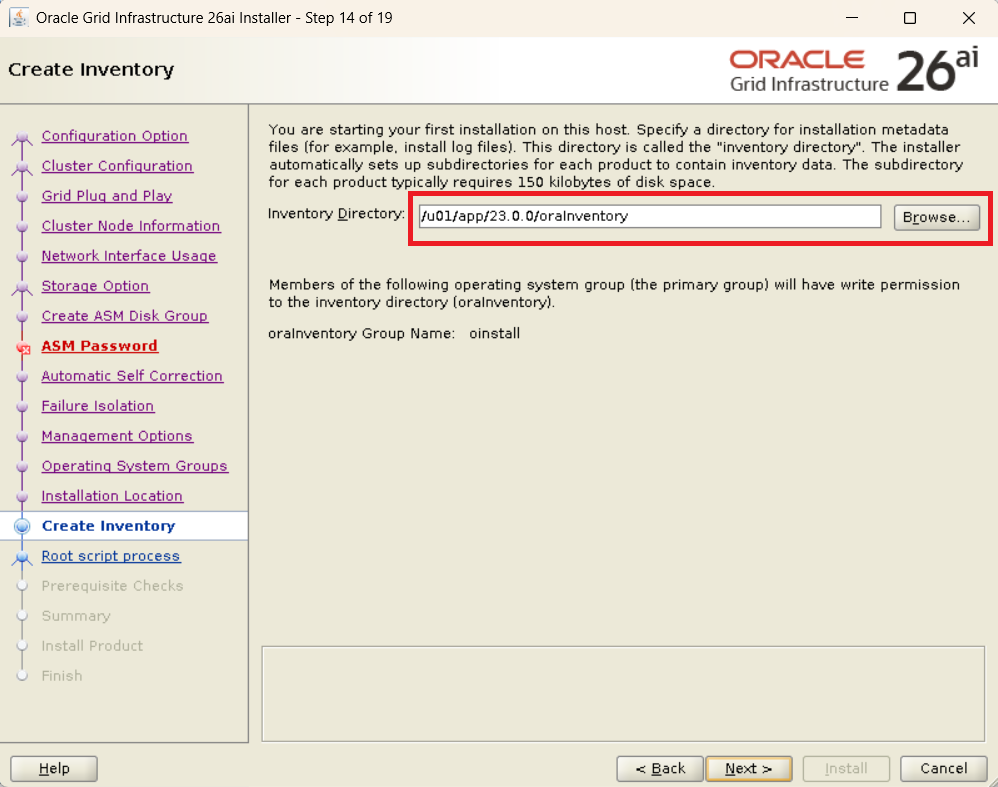
mkdir -p /u01/app/oraInventory
chown -R grid:oinstall /u01
chown -R oracle:oinstall /u01/app/oracle
chown -R grid:oinstall /u01/app/oraInventory
chmod -R 775 /u01
4.2 Software Deployment and cvuqdisk Installation
# Extract software (grid user)
unzip -q V1054596-01.zip -d /u01/app/23.0.0/grid

# Install package for CVU (root user: Perform on each node)
export CVUQDISK_GRP=oinstall
rpm -ivh /u01/app/23.0.0/grid/cv/rpm/cvuqdisk-1.0.10-1.rpm
4.3 SSH Passwordless Authentication (Both grid and oracle)
# Execute for each user (Example: grid)
ssh-keygen -t rsa -N "" -f ~/.ssh/id_rsa
ssh-copy-id rac-26ai1
ssh-copy-id rac-26ai2
[grid@rac-26ai1 ~]$ /usr/bin/ssh-keygen -t rsa
Generating public/private rsa key pair.
Enter file in which to save the key (/home/grid/.ssh/id_rsa):
Enter passphrase (empty for no passphrase):
Enter same passphrase again:
Your identification has been saved in /home/grid/.ssh/id_rsa.
Your public key has been saved in /home/grid/.ssh/id_rsa.pub.
The key fingerprint is:
SHA256:mNseMG6koUexBIpLXqk0Xa0Hph5pm4Tu54RUfEjCldk grid@rac-26ai1
The key's randomart image is:
+---[RSA 3072]----+
|..oo+..          |
|.o=++E .         |
|o+.B*.o          |
|+o=B.+ +         |
|o++ B B S        |
|...* = =         |
|....o + o        |
| ..o . . .       |
|  o.    .        |
+----[SHA256]-----+
[grid@rac-26ai1 ~]$ ssh-copy-id rac-26ai1
/usr/bin/ssh-copy-id: INFO: Source of key(s) to be installed: "/home/grid/.ssh/id_rsa.pub"
The authenticity of host 'rac-26ai1 (192.168.56.61)' can't be established.
ECDSA key fingerprint is SHA256:s28vxvYN+GUYq8Dc2KcKM1kzNqExlgTmRDNZidd67yg.
Are you sure you want to continue connecting (yes/no/[fingerprint])? yes
/usr/bin/ssh-copy-id: INFO: attempting to log in with the new key(s), to filter out any that are already installed
/usr/bin/ssh-copy-id: INFO: 1 key(s) remain to be installed -- if you are prompted now it is to install the new keys
grid@rac-26ai1's password:

Number of key(s) added: 1

Now try logging into the machine, with:   "ssh 'rac-26ai1'"
and check to make sure that only the key(s) you wanted were added.

[grid@rac-26ai1 ~]$ ssh-copy-id rac-26ai2
/usr/bin/ssh-copy-id: INFO: Source of key(s) to be installed: "/home/grid/.ssh/id_rsa.pub"
The authenticity of host 'rac-26ai2 (192.168.56.62)' can't be established.
ECDSA key fingerprint is SHA256:s28vxvYN+GUYq8Dc2KcKM1kzNqExlgTmRDNZidd67yg.
Are you sure you want to continue connecting (yes/no/[fingerprint])? yes
/usr/bin/ssh-copy-id: INFO: attempting to log in with the new key(s), to filter out any that are already installed
/usr/bin/ssh-copy-id: INFO: 1 key(s) remain to be installed -- if you are prompted now it is to install the new keys
grid@rac-26ai2's password:

Number of key(s) added: 1

Now try logging into the machine, with:   "ssh 'rac-26ai2'"
and check to make sure that only the key(s) you wanted were added.

[grid@rac-26ai1 ~]$ ssh rac-26ai1 date
Sat Jan 31 05:56:46 EST 2026
[grid@rac-26ai1 ~]$ ssh rac-26ai2 date
Sat Jan 31 05:56:51 EST 2026
[grid@rac-26ai1 ~]$ su - oracle
Password:
[oracle@rac-26ai1 ~]$ /usr/bin/ssh-keygen -t rsa
Generating public/private rsa key pair.
Enter file in which to save the key (/home/oracle/.ssh/id_rsa):
Enter passphrase (empty for no passphrase):
Enter same passphrase again:
Your identification has been saved in /home/oracle/.ssh/id_rsa.
Your public key has been saved in /home/oracle/.ssh/id_rsa.pub.
The key fingerprint is:
SHA256:FR8ShwsSkN52d+MCyW7RH88jeqZUleEva02soiw5NrU oracle@rac-26ai1
The key's randomart image is:
+---[RSA 3072]----+
|    .o..  +oo .  |
|    . . . .= o o |
|   . . o +... +  |
|    . o *.+ +. o |
|     . oS+ +.=. +|
|        o o.+ +* |
|       . o.+..+..|
|        *oE.oo   |
|       . +++     |
+----[SHA256]-----+
[oracle@rac-26ai1 ~]$ ssh-copy-id rac-26ai1
/usr/bin/ssh-copy-id: INFO: Source of key(s) to be installed: "/home/oracle/.ssh/id_rsa.pub"
The authenticity of host 'rac-26ai1 (192.168.56.61)' can't be established.
ECDSA key fingerprint is SHA256:s28vxvYN+GUYq8Dc2KcKM1kzNqExlgTmRDNZidd67yg.
Are you sure you want to continue connecting (yes/no/[fingerprint])? yes
/usr/bin/ssh-copy-id: INFO: attempting to log in with the new key(s), to filter out any that are already installed
/usr/bin/ssh-copy-id: INFO: 1 key(s) remain to be installed -- if you are prompted now it is to install the new keys
oracle@rac-26ai1's password:

Number of key(s) added: 1

Now try logging into the machine, with:   "ssh 'rac-26ai1'"
and check to make sure that only the key(s) you wanted were added.

[oracle@rac-26ai1 ~]$ ssh-copy-id rac-26ai2
/usr/bin/ssh-copy-id: INFO: Source of key(s) to be installed: "/home/oracle/.ssh/id_rsa.pub"
The authenticity of host 'rac-26ai2 (192.168.56.62)' can't be established.
ECDSA key fingerprint is SHA256:s28vxvYN+GUYq8Dc2KcKM1kzNqExlgTmRDNZidd67yg.
Are you sure you want to continue connecting (yes/no/[fingerprint])? yes
/usr/bin/ssh-copy-id: INFO: attempting to log in with the new key(s), to filter out any that are already installed
/usr/bin/ssh-copy-id: INFO: 1 key(s) remain to be installed -- if you are prompted now it is to install the new keys
oracle@rac-26ai2's password:

Number of key(s) added: 1

Now try logging into the machine, with:   "ssh 'rac-26ai2'"
and check to make sure that only the key(s) you wanted were added.

[oracle@rac-26ai1 ~]$ ssh rac-26ai1 date
Sat Jan 31 06:01:56 EST 2026
[oracle@rac-26ai1 ~]$ ssh rac-26ai2 date
Sat Jan 31 06:02:04 EST 2026
[root@rac-26ai1 grid]#
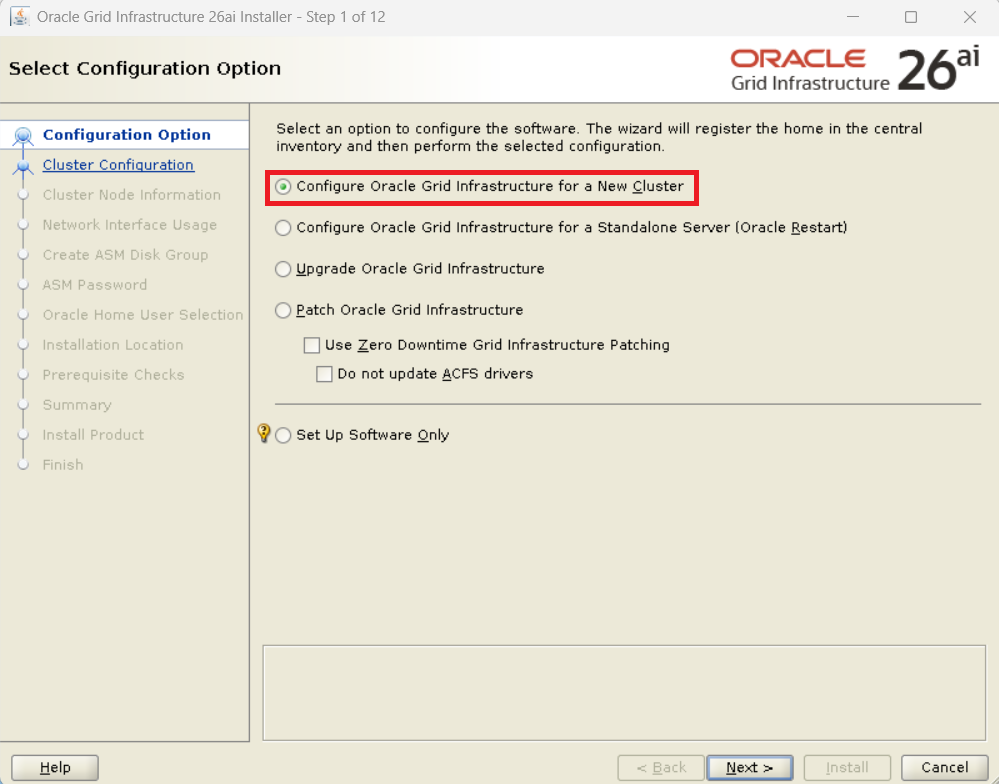
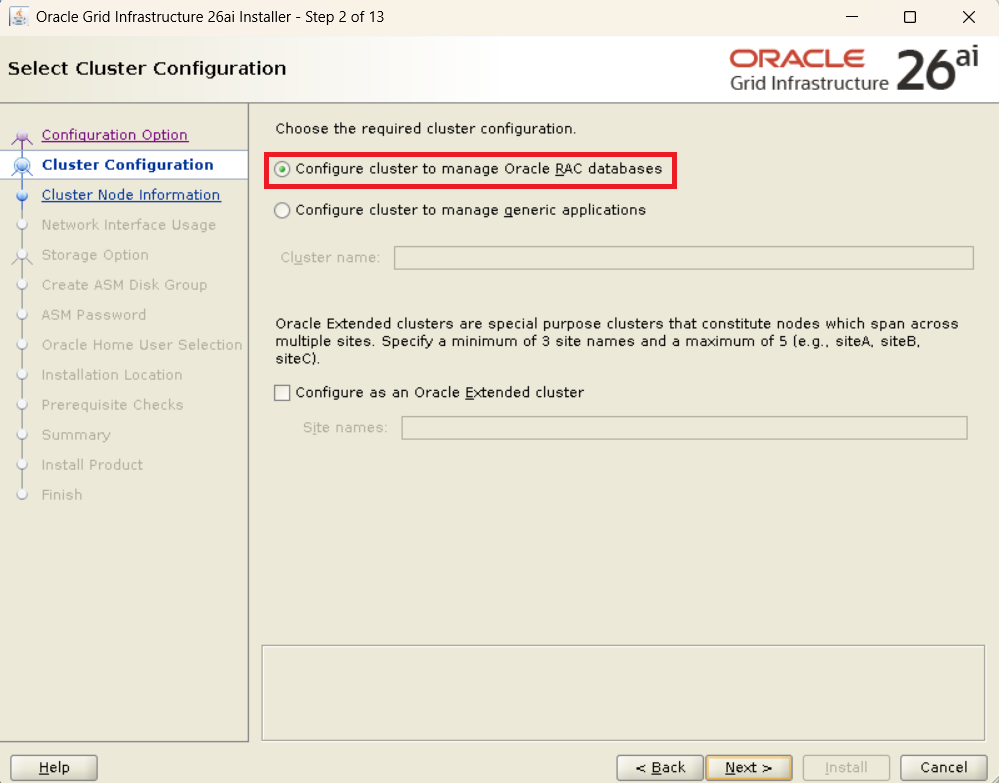
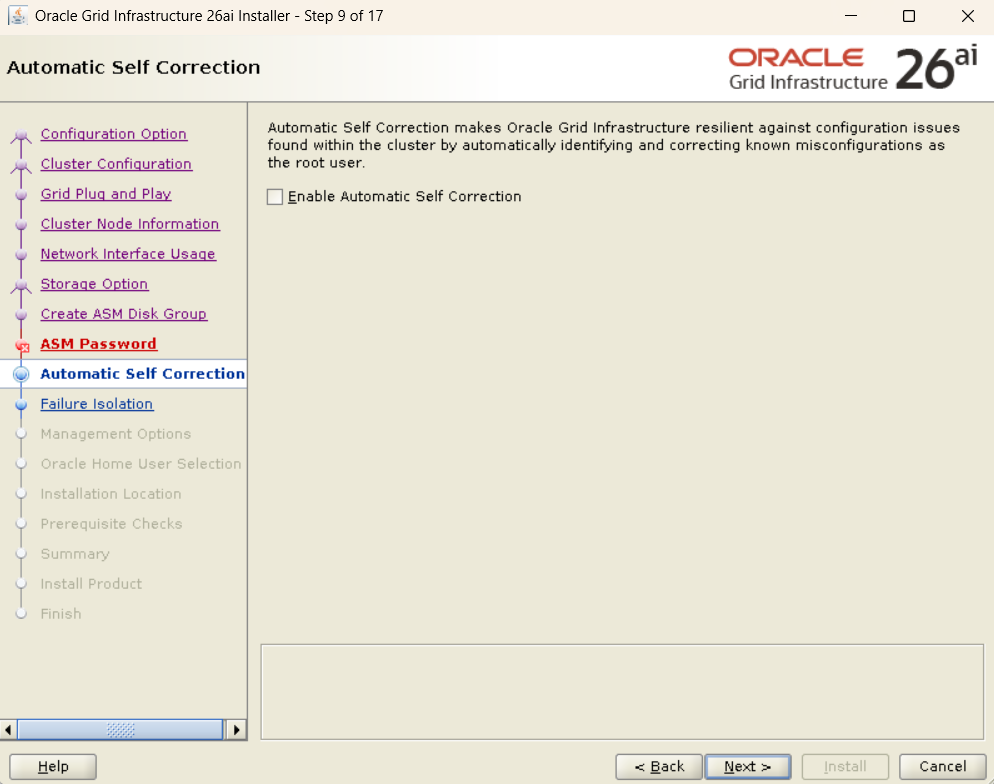
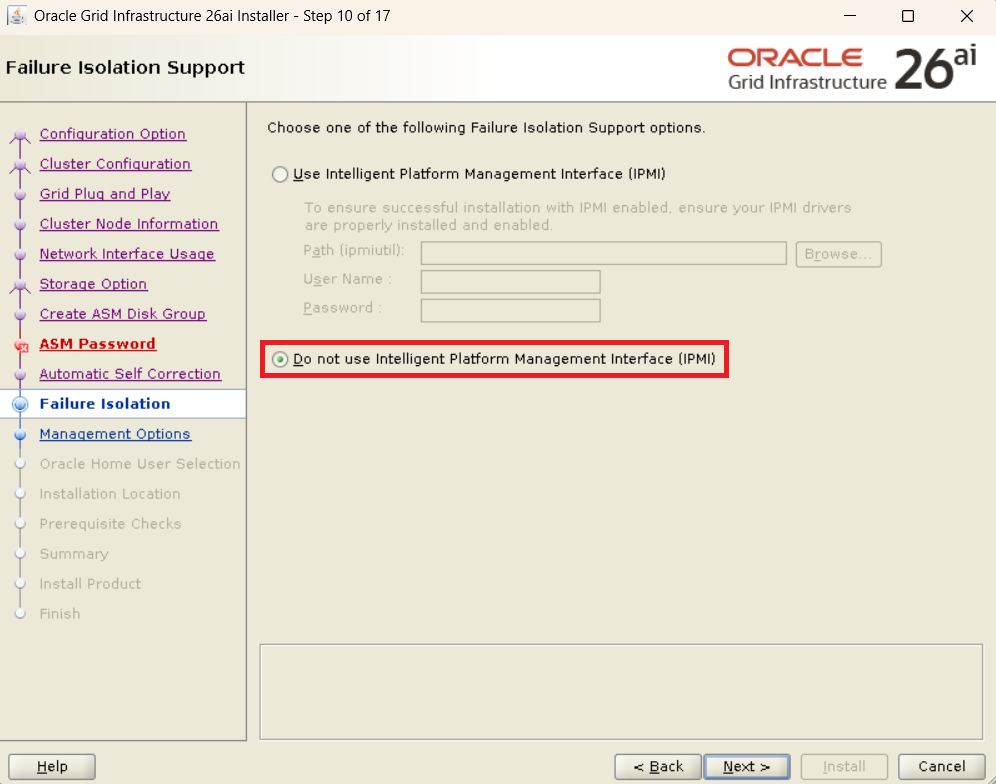
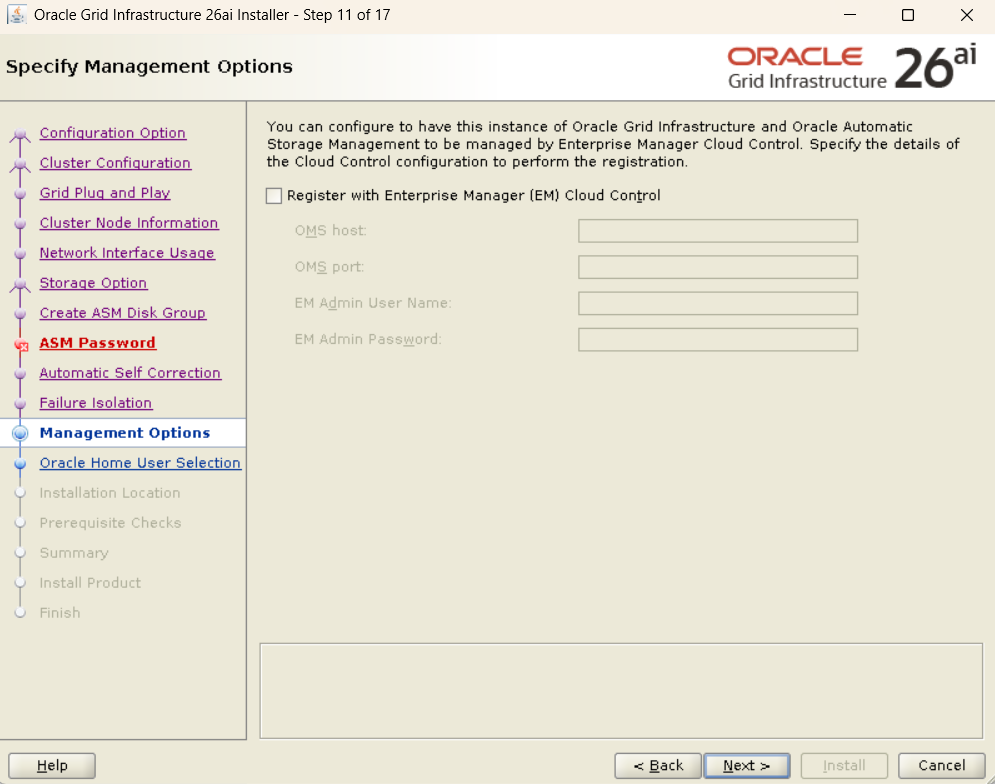
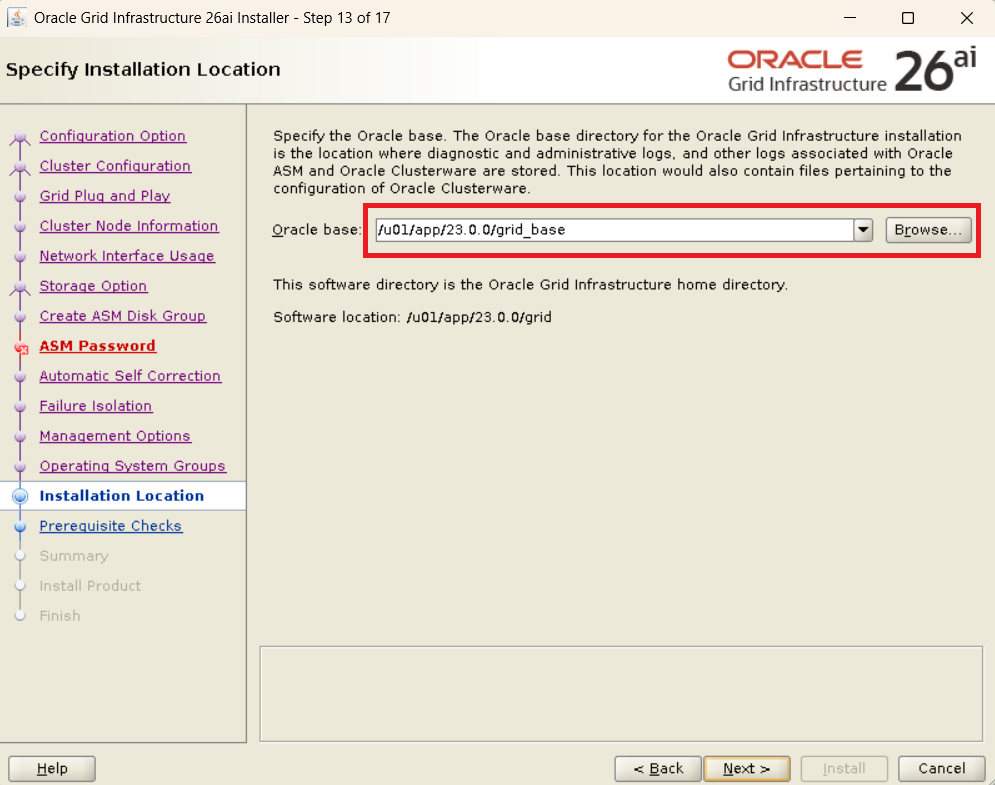
Step 5: Oracle RAC Installation (GUI)
Launch gridSetup.sh on Node 1.
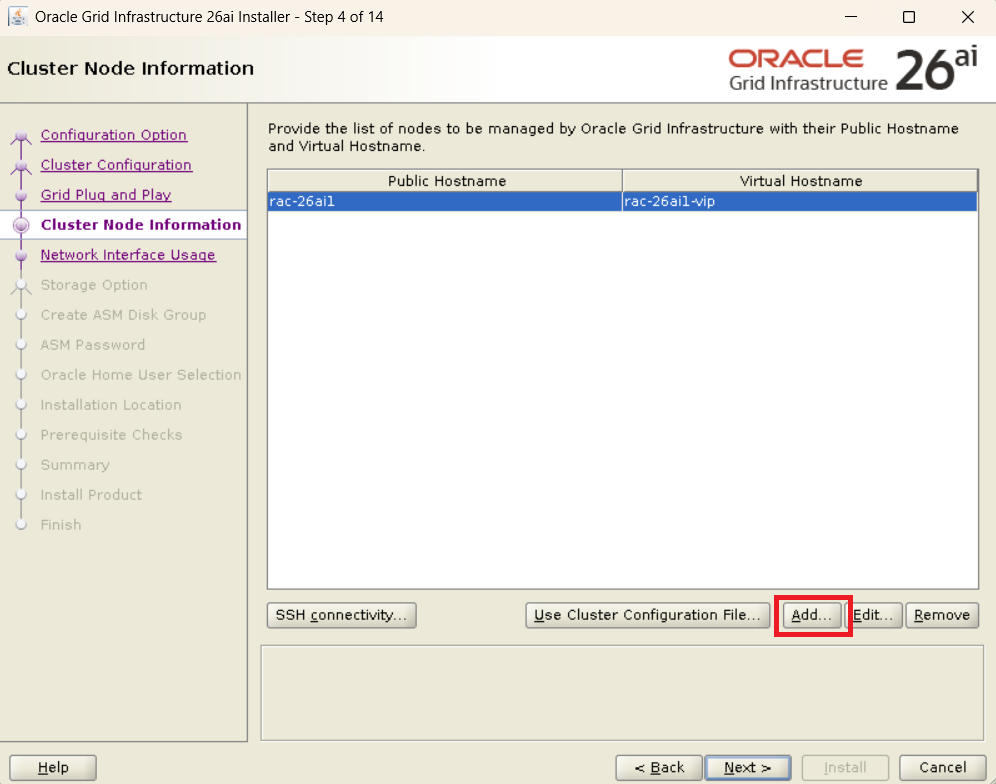
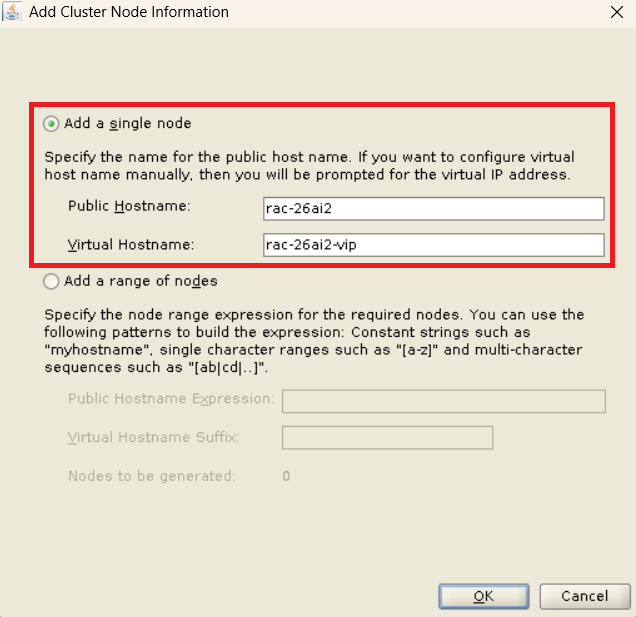
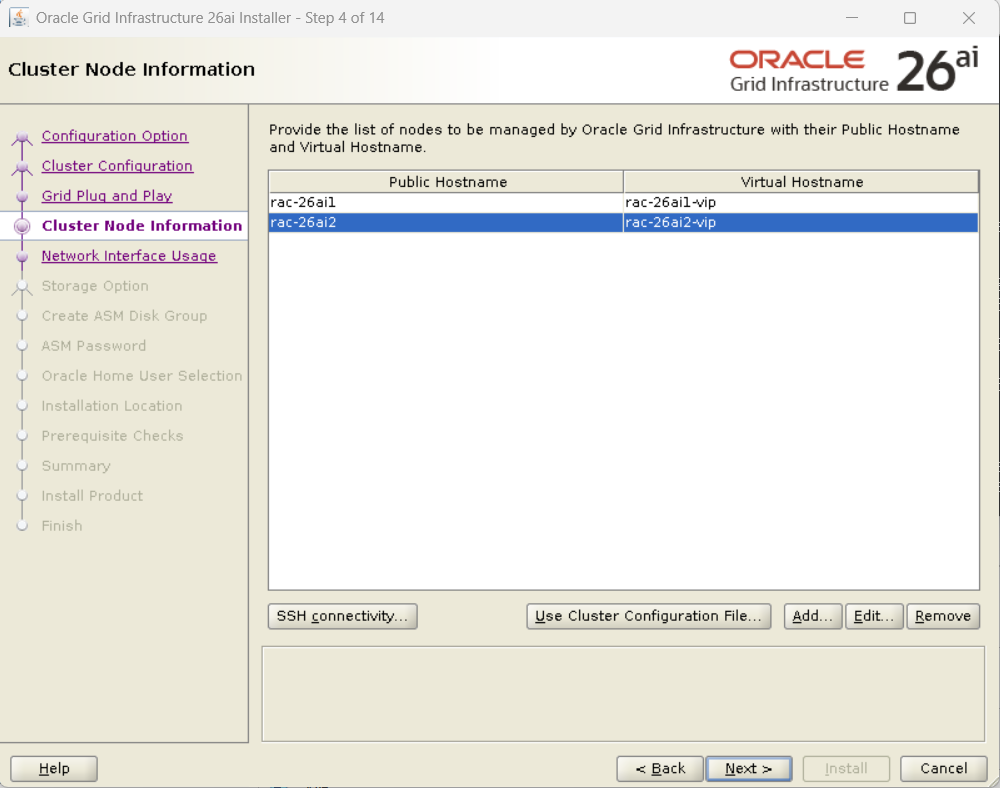
- Node Addition: Register
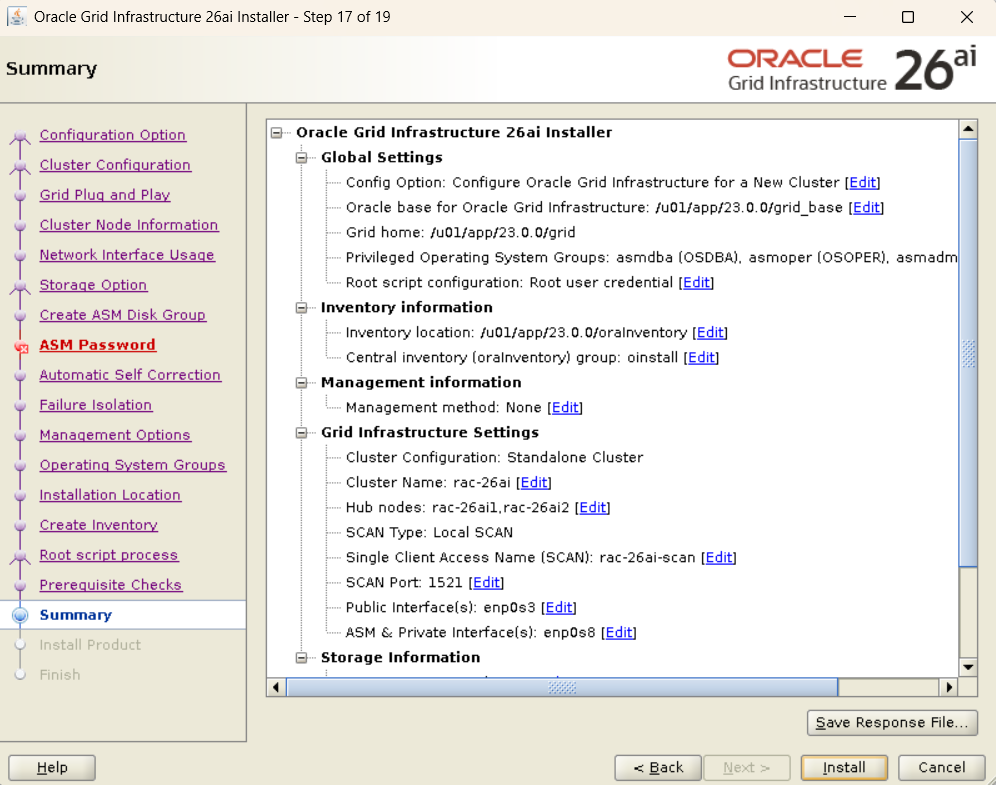
rac-26ai2and execute the SSH connectivity test. - Network: Specify
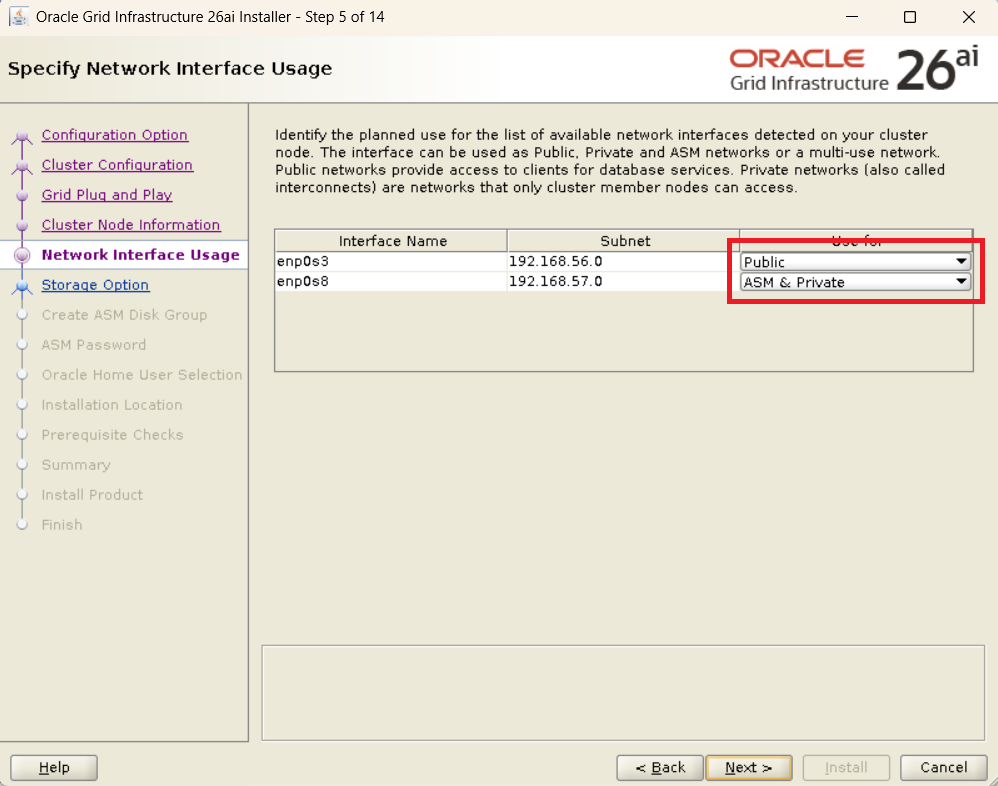
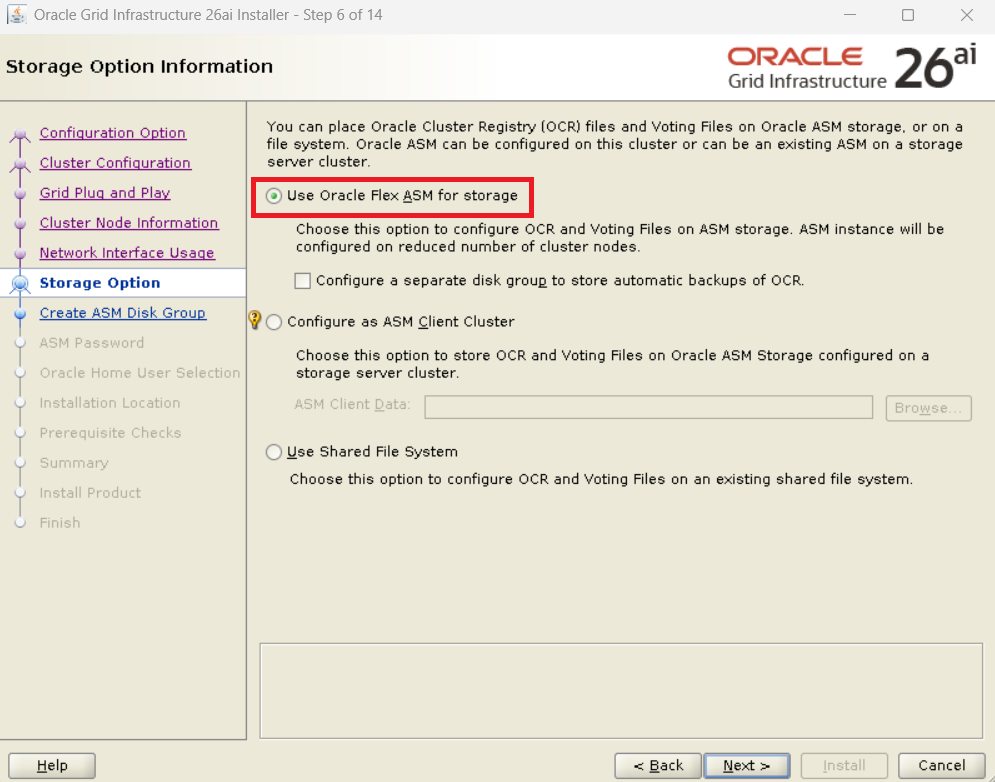
enp0s3(Public) andenp0s8(Private/ASM). - OCR Configuration: Specify
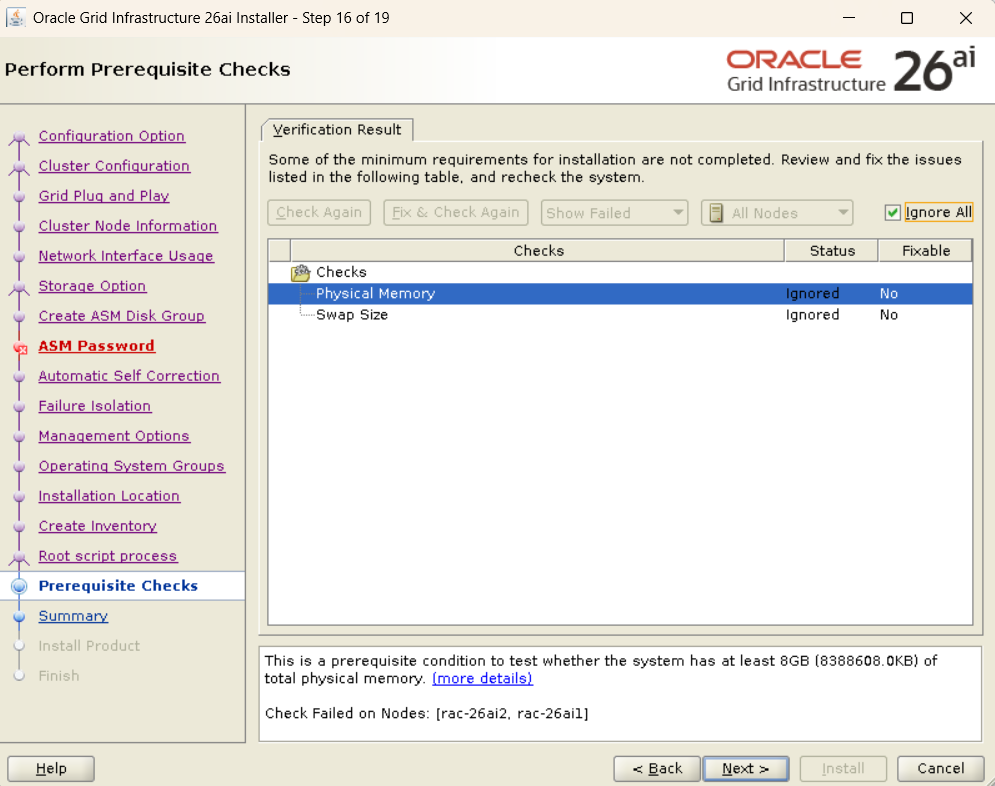
/dev/sdb1. Select “External” for redundancy. - Prerequisite Check: If there are “Failed” items on the Perform Prerequisite Checks screen, you must fix them and execute “Check Again.” You cannot complete the installation if “Failed” items remain.
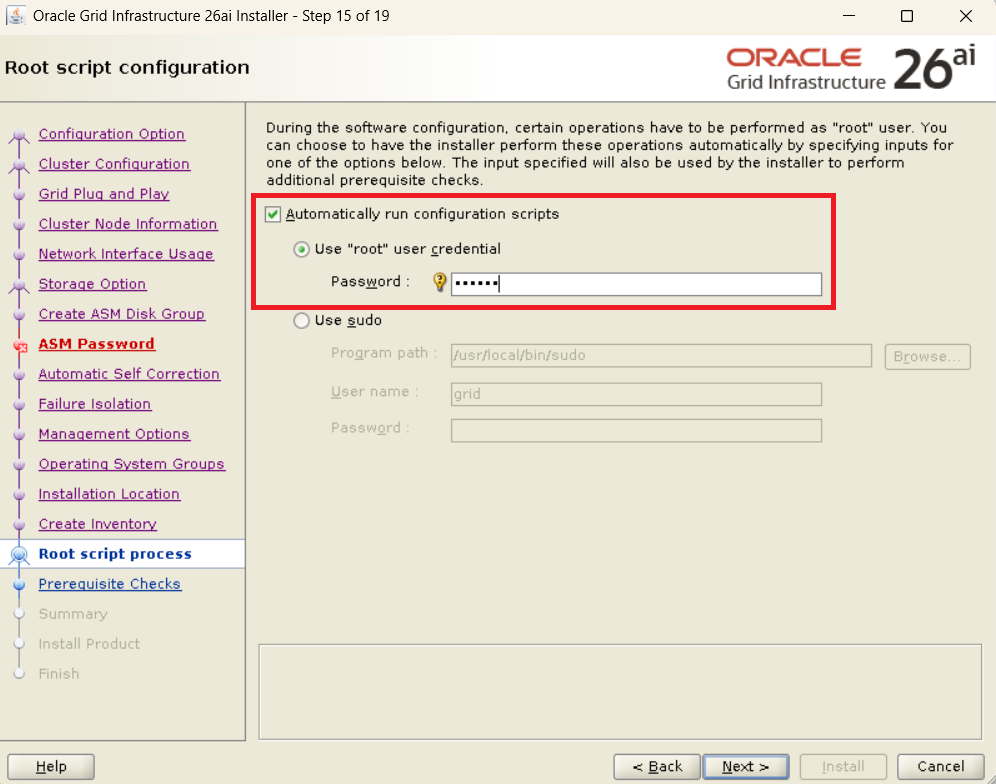
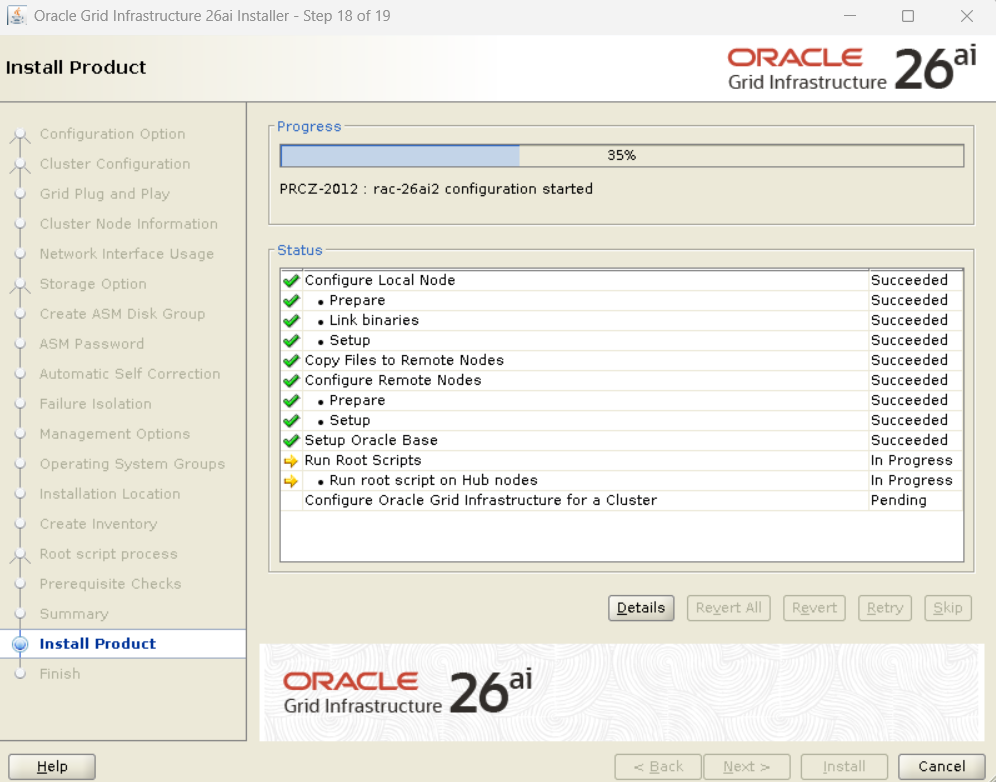
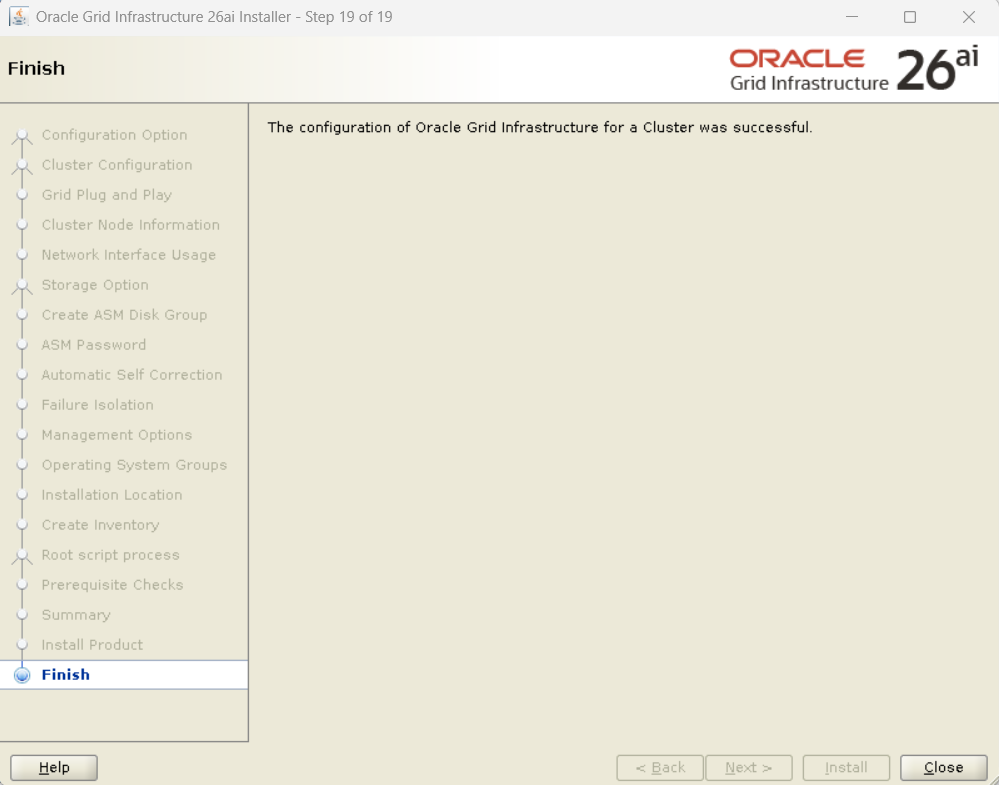
- Script Execution: Follow the instructions to execute
root.shsequentially on each node.

Step 6: Post-Installation Verification and DATA Disk Creation
6.1 Verifying Cluster Status
crsctl stat res -t
6.2 Creating the DATA Disk Group
Create the DATA group with external redundancy.
-- grid user: sqlplus / as sysasm
SQL> CREATE DISKGROUP data EXTERNAL REDUNDANCY DISK '/dev/sdc1';
Troubleshooting
| Situation | Cause | Resolution |
|---|---|---|
| Failed during CVU check | DNS/NTP/Subnet issues | Verify and fix SCAN IP resolution, time synchronization, and subnet mismatches. |
| gridSetup.sh does not launch | DISPLAY not set | Set export DISPLAY=<Terminal_IP>:0.0. |
| SSH connectivity test fails | Public key not distributed | Re-execute ssh-copy-id for each user and node. |
| Disk not found | Faulty udev rules | Check for syntax errors in /etc/udev/rules.d/. |
FAQ
Q: Why separate the private subnet? A: According to Oracle RAC specifications, it is recommended (mandatory) that interconnect (private) communication be on an independent subnet to avoid interference from other network traffic.
Q: Can I change the redundancy of a disk group later? A: No. The redundancy level (External/Normal/High) specified at the time of disk group creation cannot be changed later. If a change is necessary, the disk group must be recreated.
Q: How do I add more shared disks for redundancy? A: You can add disks in Oracle VM, update the udev rules, and then use the ALTER DISKGROUP ... ADD DISK ... command to add the disks to the ASM disk group.
Summary
- Setting up shared disks in the Oracle VM environment is the first step.
- Do not forget the subnet separation for the private network.
- “Failed” items in the Perform Prerequisite Checks must not be ignored and must be fixed on the spot.
This article explains the process targeting Oracle AI Database 26ai (screens and default values may differ for other versions).

コメント